Chill the dough for at least 30 minutes so the gluten relaxes and the fat firms up, then handle it briefly—pulse it in a processor and shape a rough ball by hand, keeping butter in pea‑sized pieces. Roll the crust about three inches wider than the pie plate, turning the pin 90° each pass, and let the overhang rest for five minutes before fitting it. Use a light‑colored metal pan, preheat the oven to 375 °F, and blind‑bake with foil and weights until the bottom is dry and set. Finally, keep a 3‑2‑1 fat‑to‑water ratio (three parts flour, two parts fat, one part ice‑cold water) and add just enough water to hold without sticking; continue for you’ll uncover more tips.
Quick Guide
- Chill the dough at least 30 minutes before rolling to relax gluten and solidify fat, preventing shrinkage.
- Use minimal handling; pulse the dough in a processor and add ice‑cold water to limit gluten development.
- Roll the dough 3 inches larger than the pan, turning the pin 90° each pass, then let it rest 5 minutes before transferring.
- Choose a shiny metal pan and preheat the oven to 375 °F for even, gentle heat that reduces crust contraction.
- Blind‑bake with foil and weights, then finish at 350 °F; maintain a 3‑2‑1 flour‑fat‑water ratio for a stable crust.
Stop Crust Shrinkage: Why Resting the Dough Matters
Why does your pie crust shrink when it hits the oven?
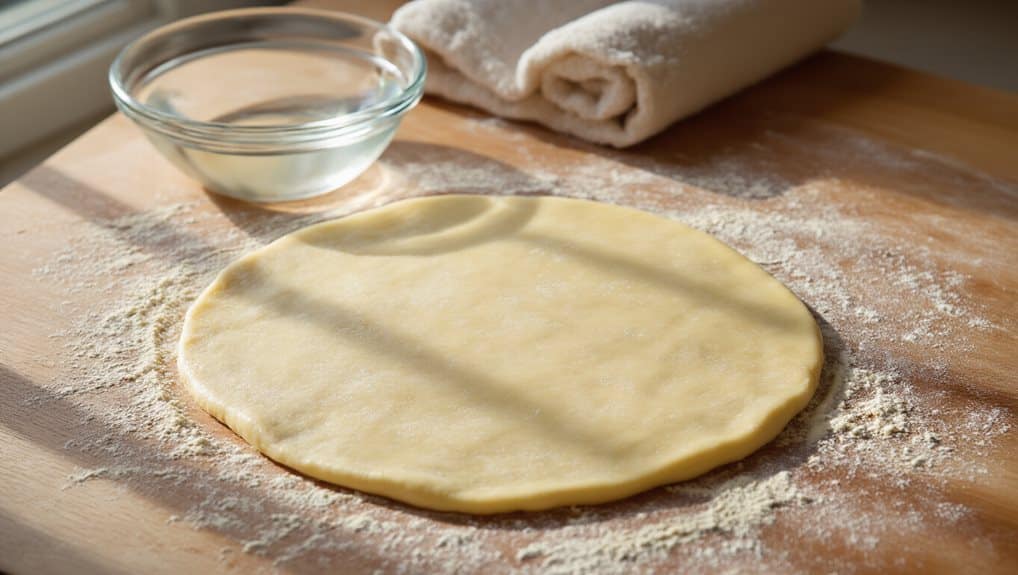
When you refrigerate dough for at least 30 minutes, the gluten strands relax, turning a tight tangle into a smooth elastic web.
This cooling also firms the fat, creating solid sheets that stay flat. Just as food-grade silicone resists odors and staining in freezer storage, a consistent chill helps your dough stay stable as it bakes.
Even water spreads, preventing gummy spots.
The relaxed gluten and solidified fat together keep the crust from contracting and tearing during baking.
Moisture redistribution increases buttery mouthfeel.
Keep Kneading Minimal to Preserve a Tender, Shrink‑Free Crust
Ever wonder why a lightly handled dough stays tender while a over‑kneaded one turns tough and shrinks? Keep kneading brief: pulse a food processor for seconds, then hand‑form a ball. Cold butter stays in pea‑sized pieces, ice water adds just enough moisture. This limits gluten development, preserves steam pockets, and yields a tender, shrink‑free crust that rolls easily and holds shape. Think of it like oven baking clay—controlled handling and the right heat prevent warping and cracks. The processor method creates pea‑sized butter pieces that form steam pockets for flakiness.
Roll the Dough 3‑Inches Wider Than Your Pie Plate to Avoid Stretching
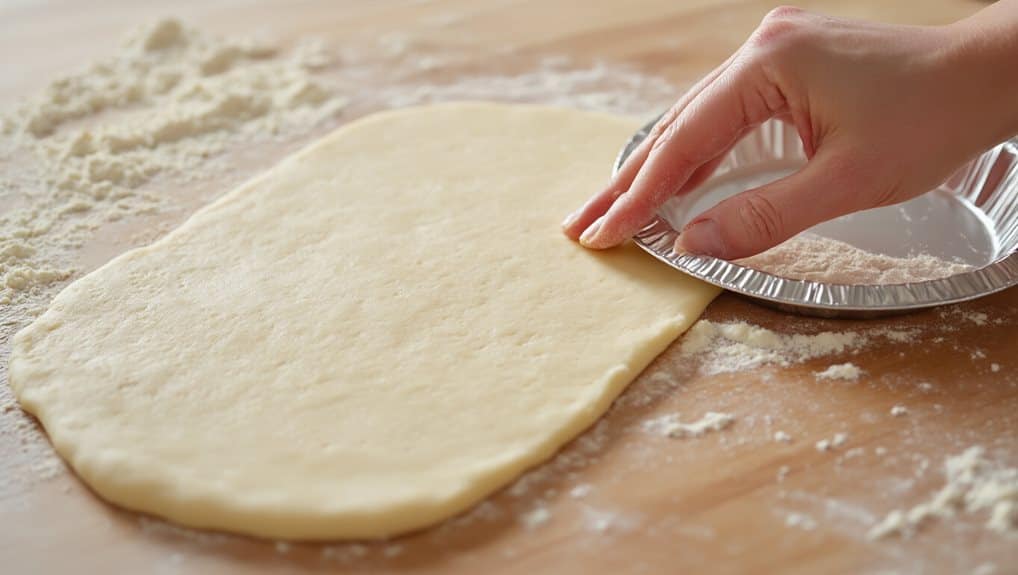
Keeping the dough just a few minutes longer yields a tender crust, but the next step—rolling it wider than the pan—prevents the inevitable stretching that makes the crust shrink.
Roll the dough about three inches beyond the plate’s diameter, starting from the center and turning the pin 90 degrees each pass.
Let the overhang fall gently into the pan, then rest it five minutes before transferring.
If you’re using coconut milk in the filling, remember opened cartons last about 4–7 days in the fridge, so plan ahead before you start baking.
This extra width gives you a relaxed fit, so the crust stays in place during baking.
Select the Right Pan and Set a Low, Even Temperature for Pre‑Baking
Choosing the right pan and setting a low, even temperature are key steps to keep your pie crust from shrinking during the pre‑bake. Use a shiny metal pan; it reflects heat, cooks uniformly, and avoids the dark‑pan over‑browning that speeds shrinkage. Preheat the oven to 375°F and place the rack in the bottom or middle, ensuring gentle, consistent heat across the crust. For easy cleanup and long-term durability, choose bakeware made from food-grade materials that resist staining and tolerate high heat.
Blind‑Bake the Crust Properly to Lock in Shape and Prevent Shrinkage

After you’ve set the oven to a low, even temperature and chosen a shiny metal pan, the next step is to blind‑bake the crust so it holds its shape.
Line the dough with snug aluminum foil, fill with dried beans or a pie‑plate weight, and bake 20‑40 minutes until lightly browned.
Remove weights, prick again, lower heat to 350 °F, and bake another 20‑25 minutes until the bottom is dry, crisp, and fully set.
If you brush on avocado oil, keep it in a cool, dark place to prevent oxidation from affecting its flavor.
Balance Fat‑to‑Water Ratios for a Flaky, Stable Crust That Holds Its Form
How much fat should you pair with water to keep a pie crust flaky yet sturdy? Use a 3‑2‑1 ratio: three parts flour, two parts fat, one part ice‑cold water. Butter adds flavor and steam, shortening gives structure, and a pinch of salt ties it together. Add water tablespoon‑by‑tablespoon until dough holds without sticking, then chill before rolling to preserve shape.
Wrapping Up
By letting the dough rest, you let the gluten relax and the fat set, which stops shrinkage before you even roll it out. Keep kneading to a minimum, roll the crust a few inches wider than the pan, and choose a sturdy dish that conducts heat evenly. Pre‑bake at a low, steady temperature, and blind‑bake correctly to lock the shape. Finally, balance the fat‑to‑water ratio for a flaky, stable crust that holds its form without shrinking.
